
PROJECT MATERIALS GUIDE
2 0 2 4 D E N V E R M E T R O R E G I O N A L
S C I E N C E A N D E N G I N E E R I N G F A I R
Rules, requirements, and recommendations for
creating an award-winning science fair display!
Project Presentation Slides: PDF
document of up to 12 slides containing
all project details that would typically
be on your poster board.
Project Introduction Video: A 3-
minute video that introduces the
viewer to your project. In other words,
your research ‘Elevator Pitch’!
Demo Video
Supporting Documents
IN-PERSON MATERIALS
REQUIRED
NEED IDEAS? CHECK OUT LAST YEAR'S
VIRTUAL PRESENTATIONS HERE!
All students must create both a physical poster board for
in-person judging and an online display for virtual judging.
VIRTUAL MATERIALS
REQUIRED
VIRTUAL MATERIALS
OPTIONAL
Poster Board: a flat or trifold board
that contains all the necessary
components to fully present your
project at the fair. Please note no
easels will be provided and posters
must be able to stand on their own.
IN-PERSON MATERIALS
OPTIONAL
Demonstrations
Visual Aids
Lab Notebook
Physical Poster
Board Instructions
Depth (front to back): 30 inches or 76 centimeters
Width (side to side): 48 inches or 122 centimeters
Height (floor to top): 108 inches or 274 centimeters
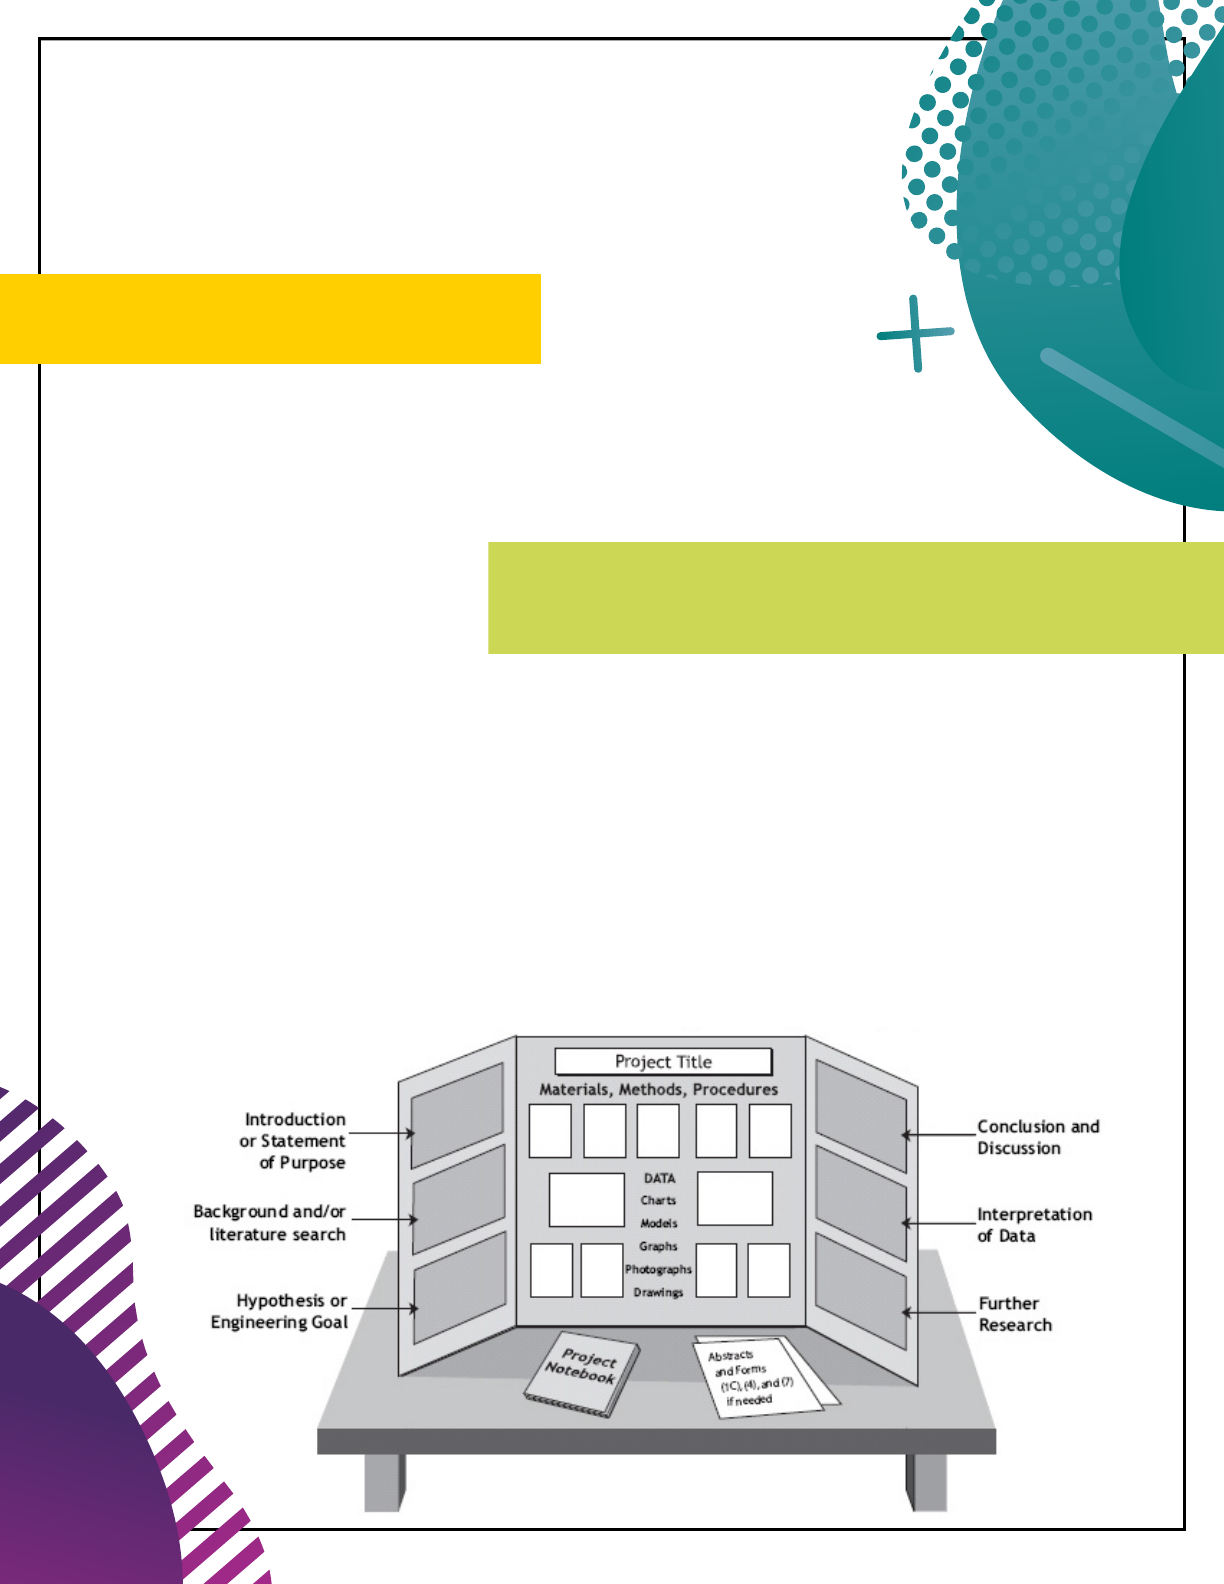
The following elements should be included on your project board:
Introduction and question or statement of purpose, background research,
hypothesis or goal, data and interpretation of data, conclusion,
discussion, and further research goals.
See the example below; however, we encourage you to implement your
own creativity in making your display area reflect you and your project.
SAMPLE POSTER LAYOUT
MAXIMUM DIMENSIONS
Image credit: https://wssef.org/project-display-safety-requirements/

Any photograph/visual image/chart/table and/or graph is allowed if:
It is not deemed offensive or inappropriate (including, but not limited to
images/photographs showing invertebrate or vertebrate animals/humans in surgical,
necrotizing or dissection situations).
It has a credit line of origin (“Photograph taken by…” or “Image taken from…” or
“Graph/Chart/Table taken from…”). If all images, etc. displayed were created by
the finalist or are from the same source, one credit line is sufficient.
Any information or items that are self-promotions or external endorsement (This
includes brands/logos, trademarks, references to an institution or mentor, etc.)
Any items intended for distribution such as disks, CDs, flash drives, brochures, booklets,
endorsements, give-away items, business cards, printed materials or food items
Postal addresses, websites, email and/or social media addresses, QR codes,
telephone and/or fax numbers of a project or finalist
Active Internet or email connections as part of displaying or operating the project
THINGS TO AVOID
In-Person
Display and Safety
PHOTOGRAPHS & IMAGES
REMEMBER...
Acknowledgments on the project display are no longer prohibited; in
alignment with the ISEF ethics statement, students may recognize those
that have supported their work in a section on the display.
Student-created logos are to be properly credited within the
photograph/image display requirements but are no longer restricted
to one instance on the display.
All content on your poster must be either your own original work or cited
properly. If you are considering using generative AI, please our AI Use Policy
1. Living organisms, including plants
2. Glass (excluding device screens)
3. Soil, sand, rock, cement and/or waste samples, even if encased in a slab of acrylic
4. Taxidermy specimens or parts
5. Preserved vertebrate or invertebrate animals
6. Human or animal food
7. Human/animal parts or bodily fluids (for example, blood, urine)
8. Plant materials (living, dead, or preserved) that are in their raw,
unprocessed, or non-manufactured state
9. All chemicals including water. No liquids can be utilized in the Project Display
10. All hazardous substances or devices (Example: poisons, drugs, firearms, weapons,
ammunition, reloading devices, grease/oil and sublimating solids such as dry ice)
11. Items that may have contained or been in contact with hazardous chemicals
(Exception: Item may be permitted if professionally cleaned and documentation for such
cleaning is available). Filters (including microbial) may not be displayed unless the Display
& Safety Committee can determine that the device was cleaned or was never used
12. Sharp items (for example, syringes, needles, pipettes, knives)
13. Flames and highly flammable materials
14. Batteries with open-top cells or wet cells
15. Drones or any flight-capable apparatus unless the propulsion power source removed
16. 3D Printers unless the power source is removed
17. Inadequately insulated apparatus capable of producing dangerous temperatures
18. Any apparatus with belts, pulleys, chains, or moving parts with tension or pinch points
that are not appropriately shielded
19. Any display items that are deemed distracting (i.e. sounds, lights, odors, etc.)
20. Any apparatus or material deemed unsafe by the Display & Safety Committee
SEE THE ISEF RULE BOOK FOR A COMPLETE LIST OF RULES AND REGULATIONS
Do Not Bring
These Things to
the Fair!
PROHIBITED DISPLAY ITEMS
Project Presentation must be a single PDF document of no more than 12 pages.
Page size must not exceed 8½” x 11” and should be in Landscape orientation.
The PDF document must not include any animations or active hyperlinks (except for
original source material in the references).
The information on each page must be readable.
The PDF document must open with the default magnification set to “Fit Page” so that
the entire page is visible at the same time.
All Project Presentation elements must conform to the same Display & Safety rules as
the in-person fair. See page 4 for details.
DESIGNING YOUR SLIDES:
We recommend starting with one of the
following pre-made templates:
Science Projects
PowerPoint Template | Google Slides Template
Engineering Projects
PowerPoint Template | Google Slides Template
Math/Computer Science Projects
PowerPoint Template | Google Slides Template
If using provided templates, do not change
the page settings on the template – they
are set up so that the template will print to
pdf with the correct page size (8½” x 11”)
and orientation (Landscape).
You may add more slides as needed to the
template, up to a maximum of 12 printed
pages
Please be aware that if your progress to
future competitions, your presentation may
need to be adapted to fit their (stricter)
requirements, such as black font on a
white background.
At DMRSEF, however, you are encouraged
to use your creativity to engage your
audience in your project as long as you
remain mindful of both professionalism and
readability.
CLICK HERE to visit the 2022 DMRSEF
Virtual Project Showcase for inspiration!
PROJECT PRESENTATION
Required
DMRSEF Staff will be hosting
a Materials Workshop on
1/25/24 over Zoom, you can
register HERE to join!
Virtual Materials
What to include in your video?
Introduce Yourself:
State your full name
You may include your school and/or
town if you wish
Rather than reciting your project title,
consider explaining your project in one
or two sentences.
Explain Your Project:
Summarize your research:
What did you do?
What did you find?
What conclusions did you draw?
You may use props or visuals as long as
they are within the Display & Safety
guidelines (see page 4).
·
PROJECT VIDEO
Posting and sharing your video
Your introductory video must be linked
from YouTube, demos and optional
materials may be uploaded into google
drive. See below for full instructions.
In YouTube, your video may be uploaded
and posted as “unlisted” so that only
those with a direct link can access it.
Unlisted videos are not searchable or
available to the public. You can choose
to list your video publicly but should
check with your parent or guardian
before doing so.
Google Drive is also a sharing option.
Remember to set permissions so that
anyone with the link can view your video.
Tips for Filming:
Film in a well-lit and non-distracting
environment
For best results, film your video
horizontally (landscape).
Keep the camera still and in place
during filming.
Speak clearly and loudly enough that
the recording is able to pick up every
word you say.
Avoid long pauses and filler phrases
Listen to your video after recording to
ensure your voice is clear and audible,
and that the video has not picked up
too much background noise.
Please Remember:
Videos should be no longer than 2-3
minutes and should broadly summarize
your project.
Students are the only individuals
allowed to appear in the video,
however, they are not required to do so.

If there is a component of your project (e.g. a device) that you would like to
demonstrate, you will have the option to upload an additional video.
The project demo video must be no longer than 1-2 minutes.
Props/visuals used must not violate any normal D&S safety guidelines for in-person
science fairs (see page 4).
Student researchers must follow all risk assessment protocols outlined in their
Form 3 (e.g. use proper PPE in the video).
The project demo video may include people other than the student researcher(s)
as long as they are not identifiable (no faces).
Supplementary video materials must also be uploaded to YouTube in order to share.
If you would like to include a section of your project notebook or other supporting
materials, you may do so. Please note that this is considered supplementary information
that is not included in the judging rubric. You will not be penalized if you choose not to
include these materials.
This single document should be no more than 12 pages and can include, but is not
limited to:
Up to 12 pages of a lab notebook
Written work relating to your project
Photos in compliance with D&S Regulations
SUPPORTING DOCUMENTS
Remember:
Your virtual display is meant to represent
your project entirely on its own!
The virtual fair will be open to judges
and community members prior to interviews,
and they should be able to understand your
project without you there to explain it for
them.
Optional Virtual
Materials
DEMO VIDEOS
Please be sure your virtual display contains none of the following:
Brand logos, trademarks, flags, patent status (written or graphic), awards or medals.
Personal information (addresses, social media accounts, phone number, etc.) of finalist.
Prior year’s written material or visual depictions.
Anything labeled as “Abstract”.
Animations or active hyperlinks.
VIRTUAL
DISPLAY AND
SAFETY RULES
Photographs, visual images (including background images),
charts, tables and/or graphs are allowed if:
They are properly credited.
If all photos, images, graphs, etc. were taken or created by the student researcher, then
a single statement to that fact should be placed on the Title Page of the Project
Presentation.
If the photos, images, graphs, etc. come from different sources, then EACH individual
photo, image, graph, etc. must have its own credit line below it.
They are not deemed offensive or inappropriate (which includes images/photos/videos
showing vertebrate animals/humans in surgical, necrotizing or dissection situations) by
the SRC, Display & Safety Committee or DMRSEF staff.
They are from the Internet, magazine, newspaper, journal, etc. and a credit line is
attached immediately underneath it.
They are photographs or visual depictions of the student presenter(s).
They are photographs of a person other than that of the student presenter(s) as long as
there is a photo release signed by the subject, and if under 18, also by the guardian of
the subject. Photo releases must be uploaded with the researcher’s project plan for
verification.
SEE THE ISEF RULE BOOK FOR A COMPLETE LIST OF RULES AND REGULATIONS
Page 4
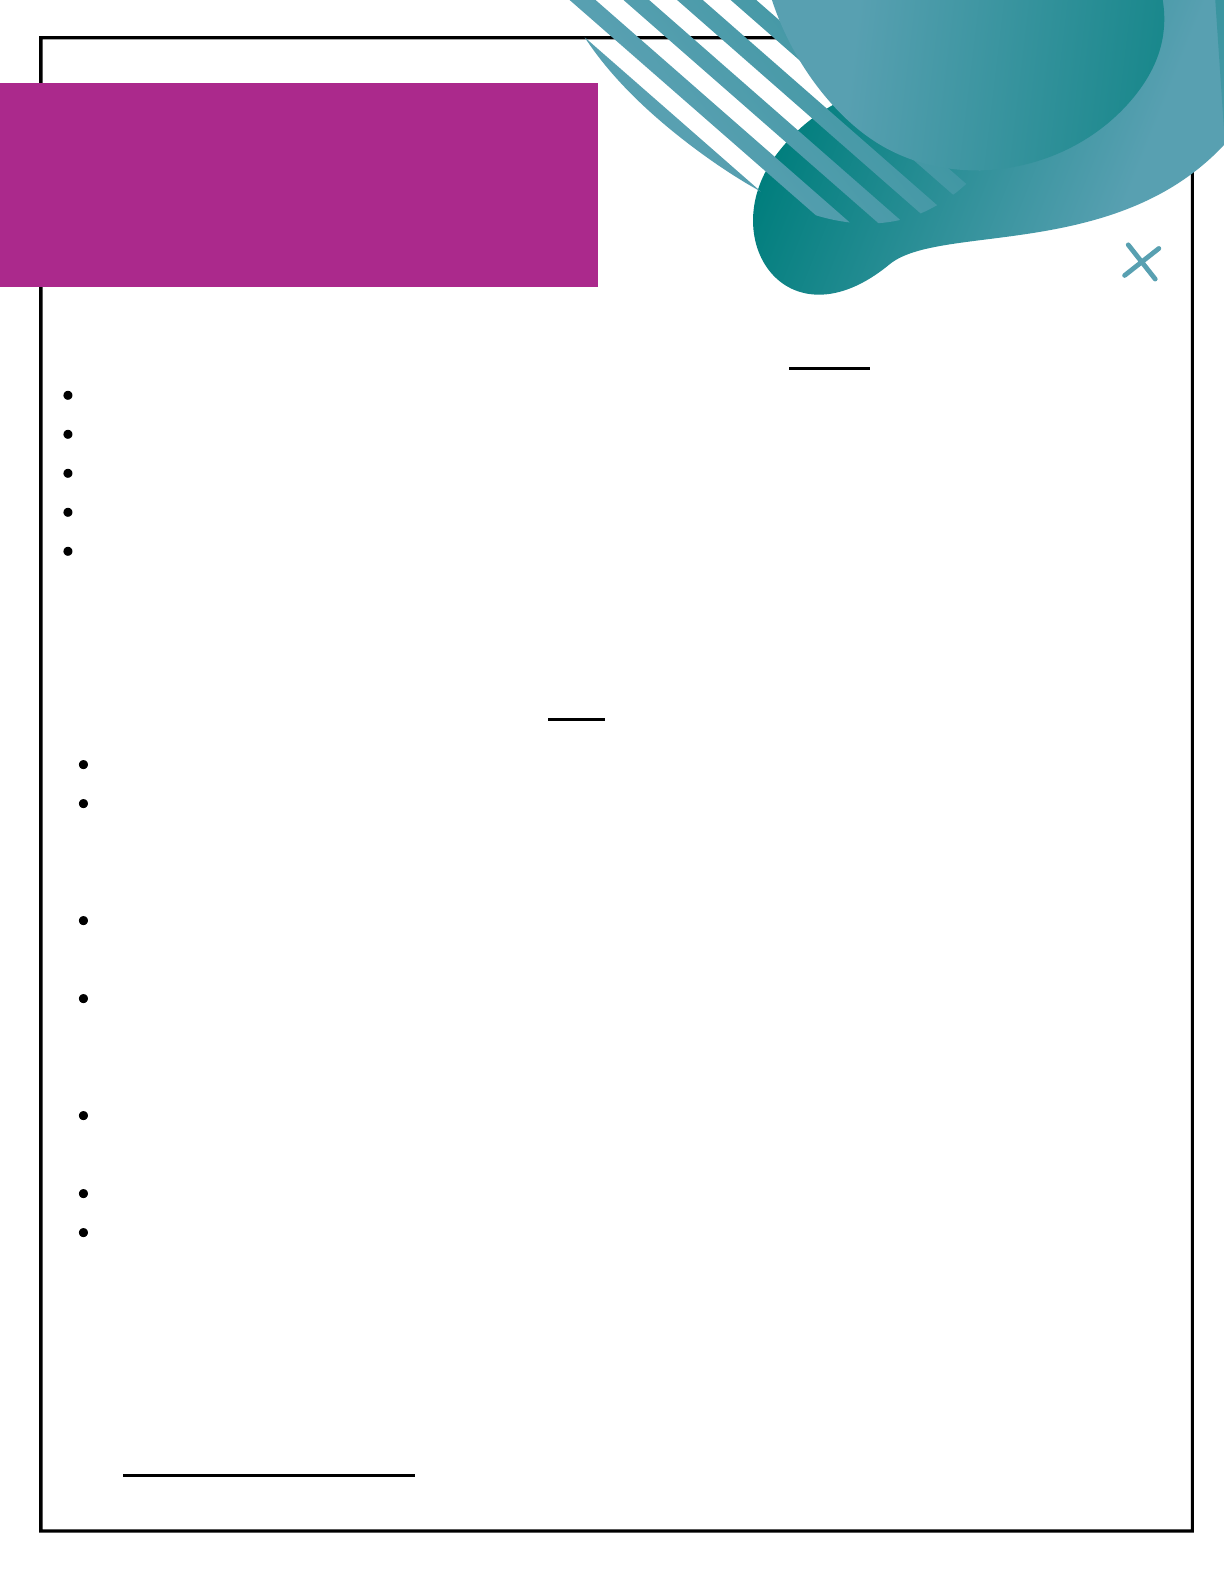
LOCATE THE “CREATE” BUTTON IN THE
UPPER RIGHT-HAND CORNER OF YOUTUBE.
SELECT “UPLOAD VIDEOS” AND SELECT
THE FILE YOU WISH TO SUBMIT:
UPLOADING AN
UNLISTED VIDEO
ON YOUTUBE
Page 5

TITLE YOUR VIDEO AND FILL IN
APPROPRIATE DESCRIPTIONS AND
OPTIONS. UNDER “VISIBILITY”, SELECT
“UNLISTED” AND SAVE YOUR UPLOAD.
THE LINK PROVIDED IS THE
CUSTOM URL FOR YOUR VIDEO.
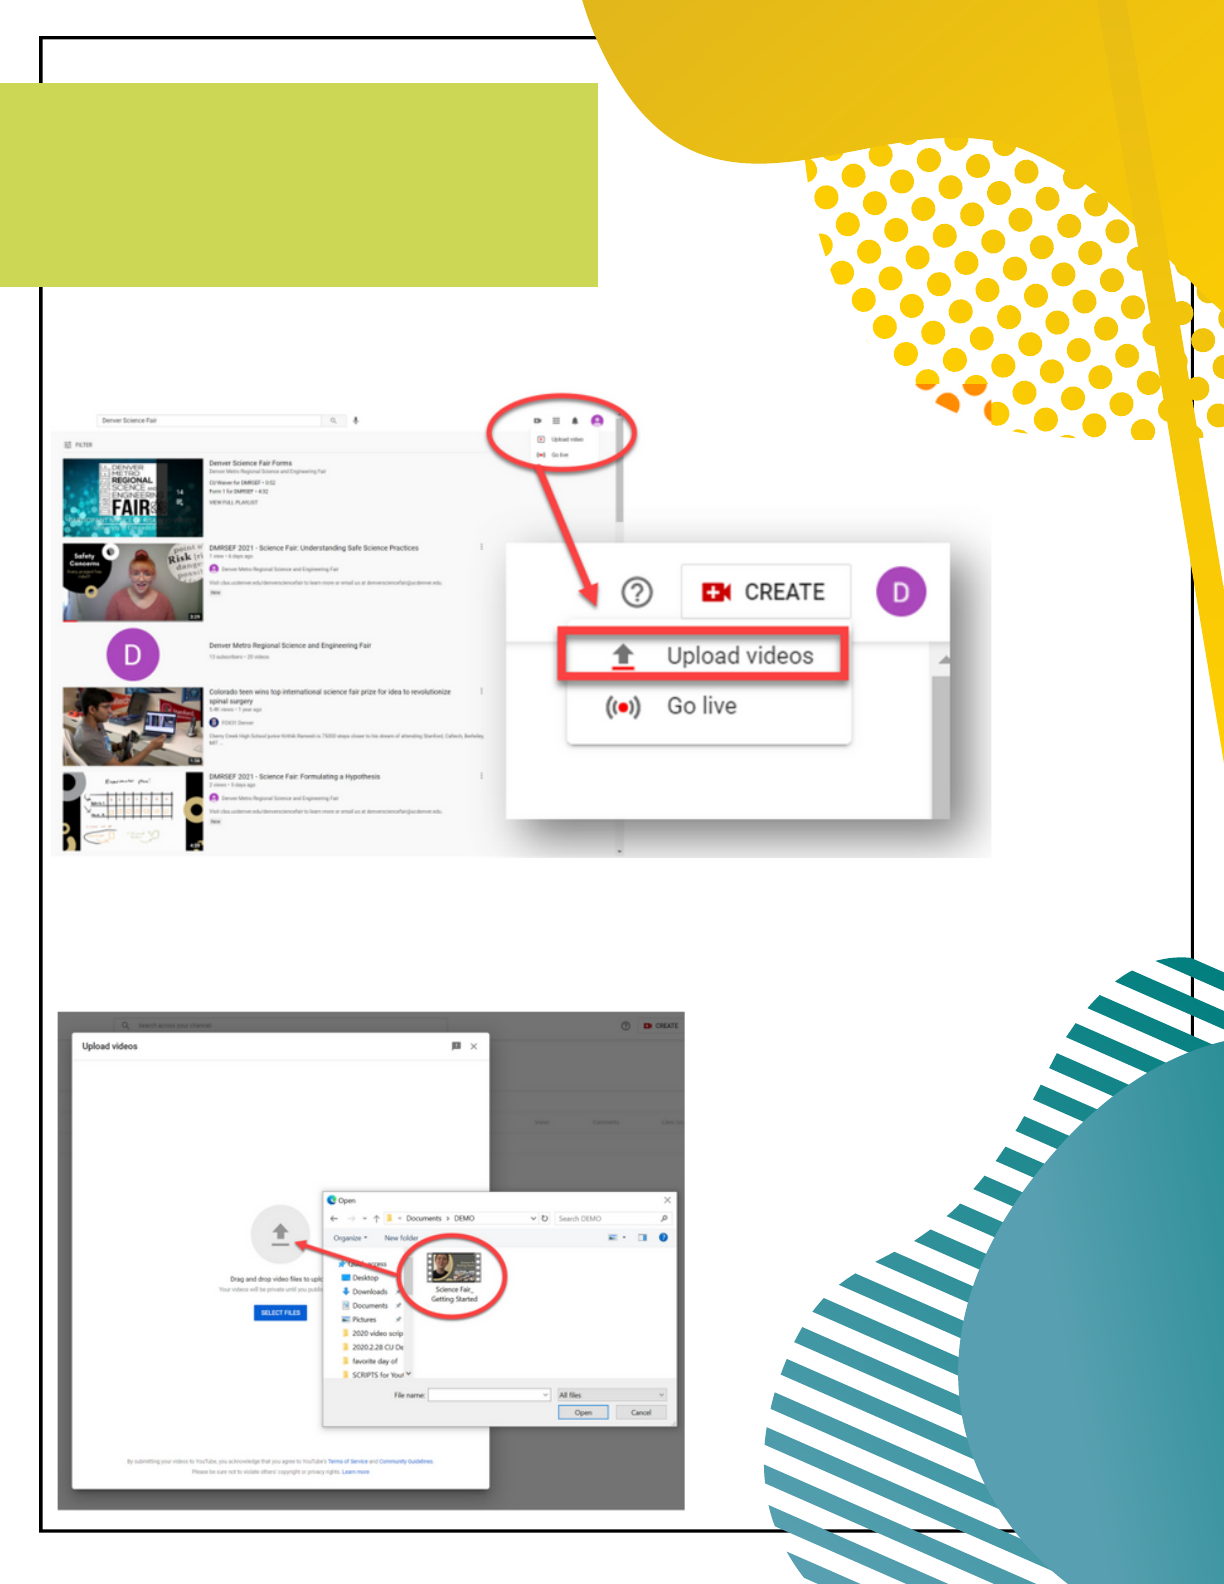
LOCATE “FILE” IN THE UPPER LEFT-
HAND CORNER OF YOUR POWERPOINT
(OR GOOGLE SLIDES) DOCUMENT
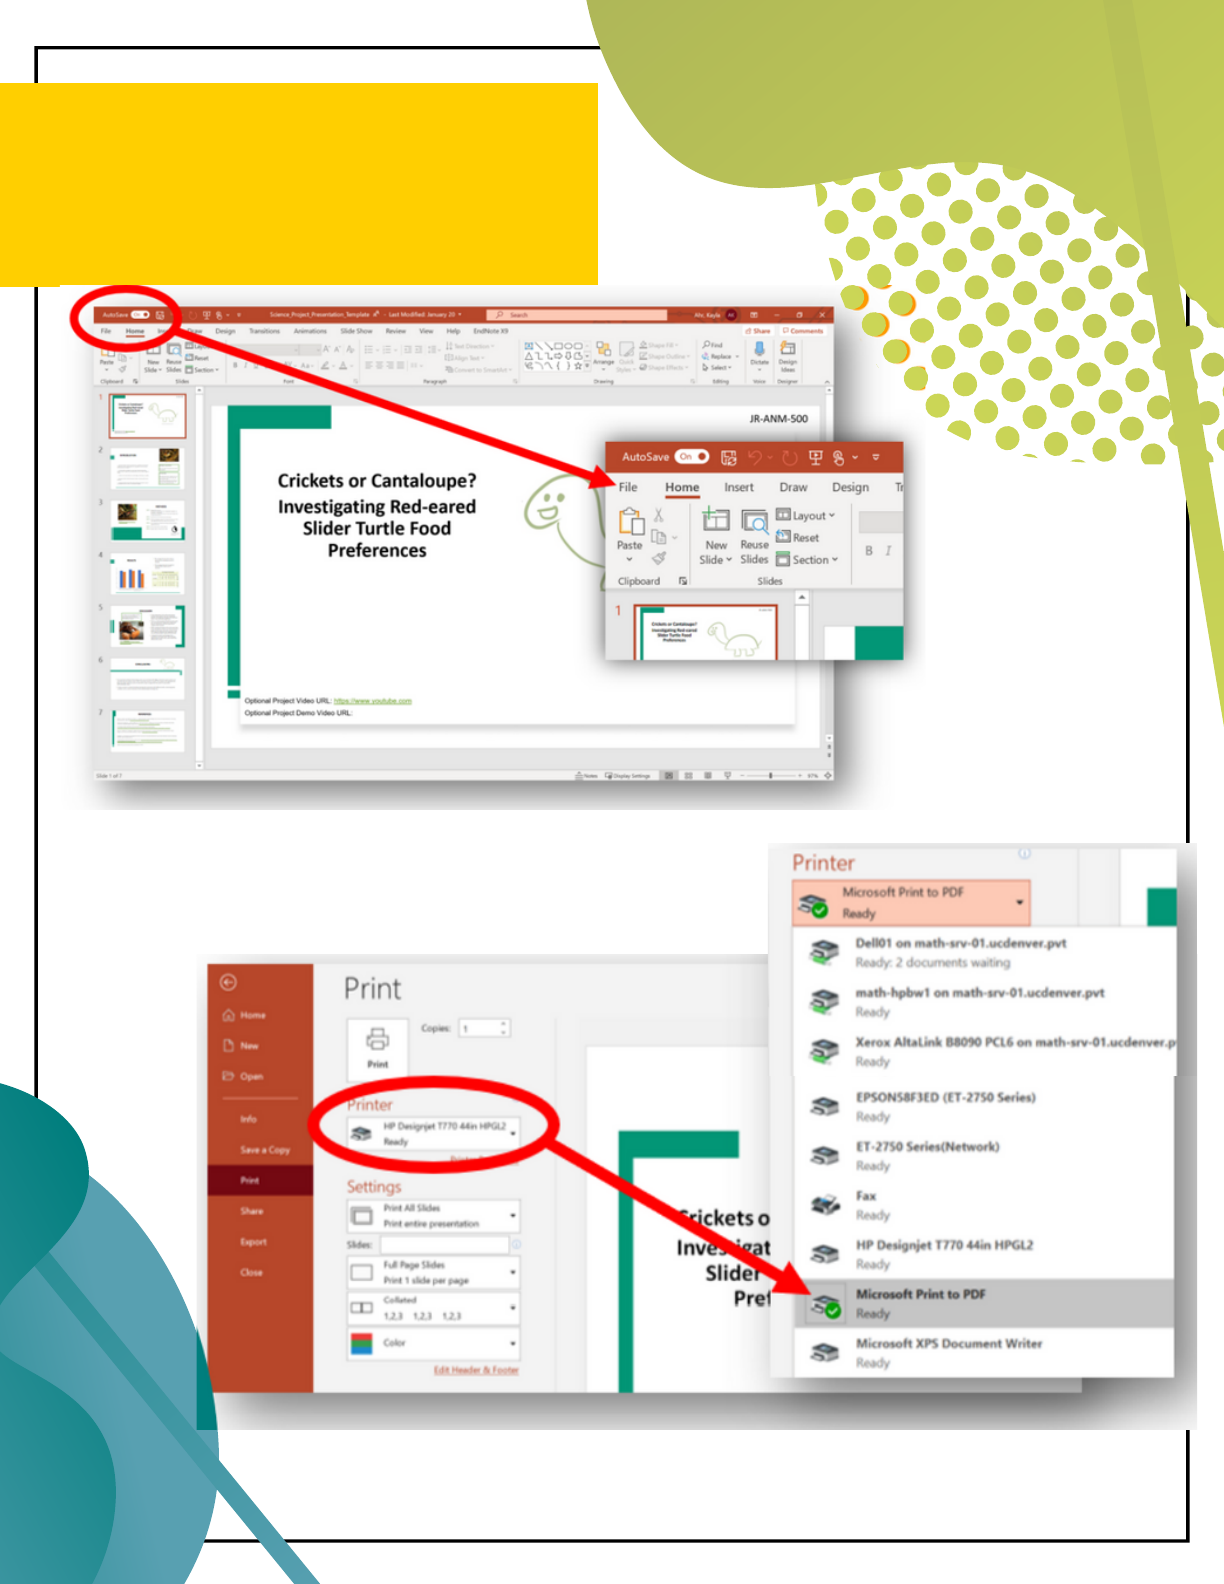
SELECT PRINT, AND CHANGE THE
SELECTED PRINTER TO "PRINT TO PDF"
SAVING YOUR
POWERPOINT AS A
PDF DOCUMENT
Page 5
ADJUST SETTINGS TO PRINT
THE CORRECT SLIDES, IN
ORDER. THEN HIT "PRINT".
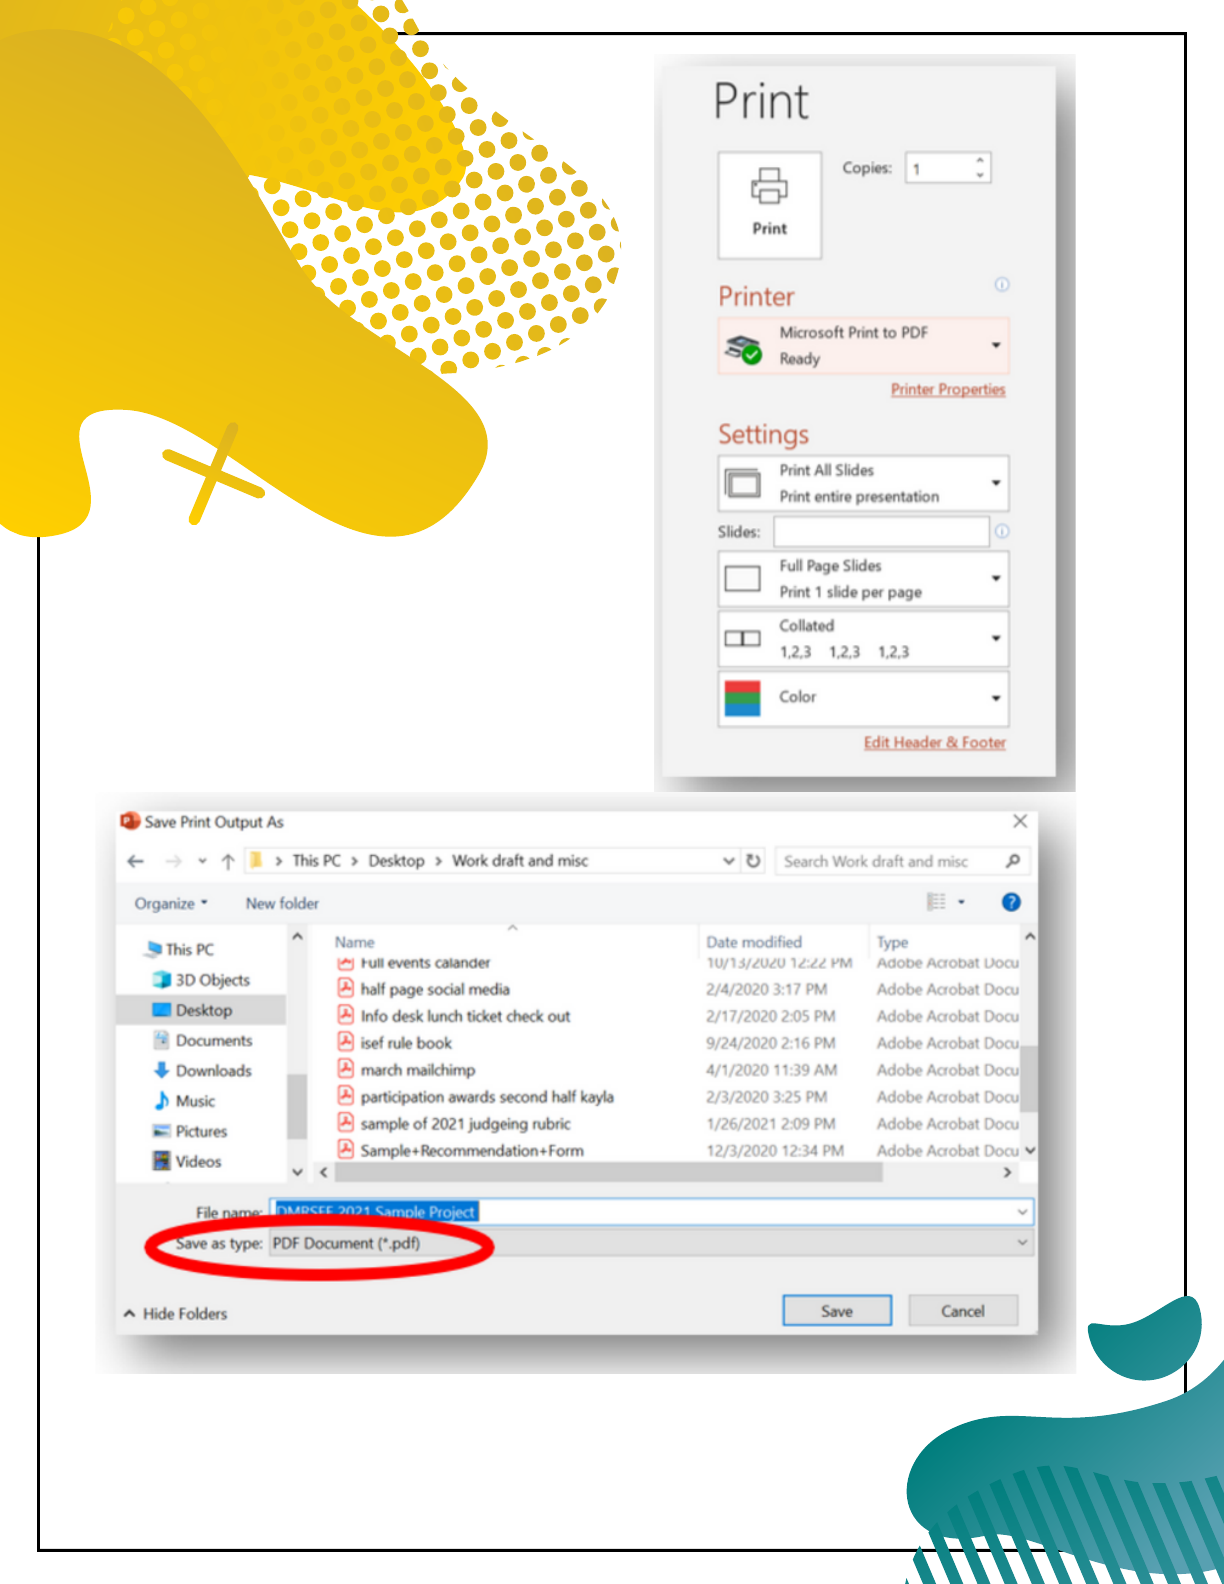
BE SURE TO TITLE AND SAVE YOUR PROJECT.
DOUBLE CHECK TO BE SURE "SAVE TYPE AS"
INDICATES YOUR FILE IS IN PDF FORM
